
מדריך להתקנת שרת WEB על מערכת הפעלה centos 6
כדי להריץ שרת web צריך לבצע כמה התקנות על השרת.
במדריך זה אנחנו נשתמש במערכת הפעלה centos 6 ובגרסאות העדכניות לכל תוסף שנתקין
תחילה יש לבצע עדכון למערכת
ֳ# yum update
עם התוסף wget לא מותקן על מערכת ההפעלה אז יש להוסיף
# yum install wget
1. נתחיל בהתקנת apache 2.4.4
# cd /usr/src
# wget https://www.apache.org/dist/httpd/httpd-2.4.7.tar.gz
# tar xvf httpd-2.4.7.tar.gz
# /usr/local/apache2/bin/apachectl startכעת כדאי לבדוק עם apache הותקן ועובד יש להיכנס לדפדפן ולרשום את הכתובת IP של השרת וקבל את העמוד הבא: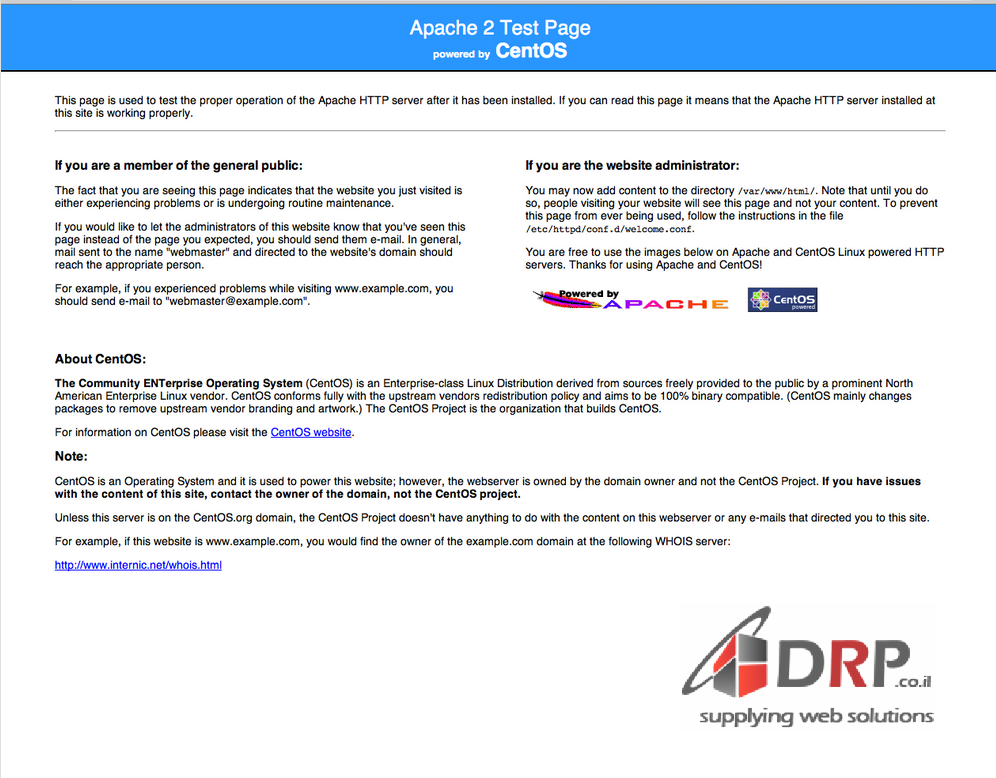
ניתן לבדוק את כתובת הIP שלכם בצורה הבאה:
# ifconfig eth0 | grep inet | awk '{ print $2 }'
אם לא מופיע העמוד הנכון וקיבלתם הודעת שגיאה שאתם לא יכולים לגשת לאתר אז כנראה הפורט חסום אז יש להכניס את הקוד כדאי לפתןח ולבדוק שוב
# iptables -A INPUT -p tcp -m tcp --dport 80 -j ACCEPT
כדי לוודא שהתוסף יעבוד לאחר אתחול השרת יש להכניס את הקוד הבא:
# chkconfig httpd on
2. התקנת Mysql
# cd /opt/
# wget https://cdn.mysql.com/Downloads/MySQL-5.6/MySQL-server-5.6.15-1.el6.i686.rpm
# rpm -ivh MySQL-server-5.6.15-1.el6.i686.rpm
# /etc/init.d/mysql start
Starting MySQL.. SUCCESS!
להגדיר את MYSQL:
# /usr/bin/mysql_secure_installation
NOTE: RUNNING ALL PARTS OF THIS SCRIPT IS RECOMMENDED FOR ALL MySQL
SERVERS IN PRODUCTION USE! PLEASE READ EACH STEP CAREFULLY!
password for the root user. If you've just installed MySQL, and
In order to log into MySQL to secure it, we'll need the current
you haven't set the root password yet, the password will be blank,
OK, successfully used password, moving on…
so you should just press enter here.

Enter current password for root (enter for none):

Setting the root password ensures that nobody can log into the MySQL
Re-enter new password:
root user without the proper authorisation.

You already have a root password set, so you can safely answer 'n'.

Change the root password? [Y/n] y
New password:
Password updated successfully!
them. This is intended only for testing, and to make the installation
Reloading privilege tables..
 ... Success!


By default, a MySQL installation has an anonymous user, allowing anyone
to log into MySQL without having to have a user account created for
ensures that someone cannot guess at the root password from the network.
go a bit smoother.  You should remove them before moving into a
production environment.

Remove anonymous users? [Y/n] y
 ... Success!

Normally, root should only be allowed to connect from 'localhost'.  This

Disallow root login remotely? [Y/n] y
– Dropping test database…
 ... Success!

By default, MySQL comes with a database named 'test' that anyone can
access.  This is also intended only for testing, and should be removed
before moving into a production environment.

Remove test database and access to it? [Y/n] y
 ... Success!
All done! If you've completed all of the above steps, your MySQL
 - Removing privileges on test database...
 ... Success!

Reloading the privilege tables will ensure that all changes made so far
will take effect immediately.

Reload privilege tables now? [Y/n] y
 ... Success!

installation should now be secure.

Thanks for using MySQL!
Cleaning up…
כדי לוודא שהתוסף יעבוד לאחר אתחול השרת יש להכניס את הקוד הבא:
# chkconfig mysqld on
3. התקנת PHP
# rpm -Uvh https://mirror.webtatic.com/yum/el6/latest.rpm
# yum install php56w php56w-opcache
כדי לבדוק שהשרות עובד יש להכין דף מידע. info.php
אם אין לכם את התוסף nano אז יש להתקין אותו לפני
# yum install nano
להכנת הקובץ:
# nano /var/www/html/info.php
כעת יפתח לכם חלון טקסט יש להכניס את הטקסט הבא. לסגור ולשמור! ctl + x
<?php
phpinfo();
?>
# service httpd restart
כדי לבדוק שהקובץ עובד יש להיכנס לדפדפן ולהכניס את הכתובת IP של השרת וסיומת info.php
לדוגמא
80.55.154.240/info.php
ותקבלו חלון עם כל הפרטים לגבי השרת שלכם וכל התכנות המותקנות עליו
4. התקנת phpmyadmin :
# rpm -Uvh https://rpms.famillecollet.com/enterprise/remi-release-6.rpm
# yum –enablerepo=remi install phpMyAdmin
הגדרת גישה ל phpmyadmin :
כדי לגשת לעמוד web של phpmyadmin יש להגדיר הרשאות גישה. או להתיר לכולם לגשת לעמוד או ל IP ספציפי.
כדי לאפשר גישה לכולם יש להזין את הקוד הבא:
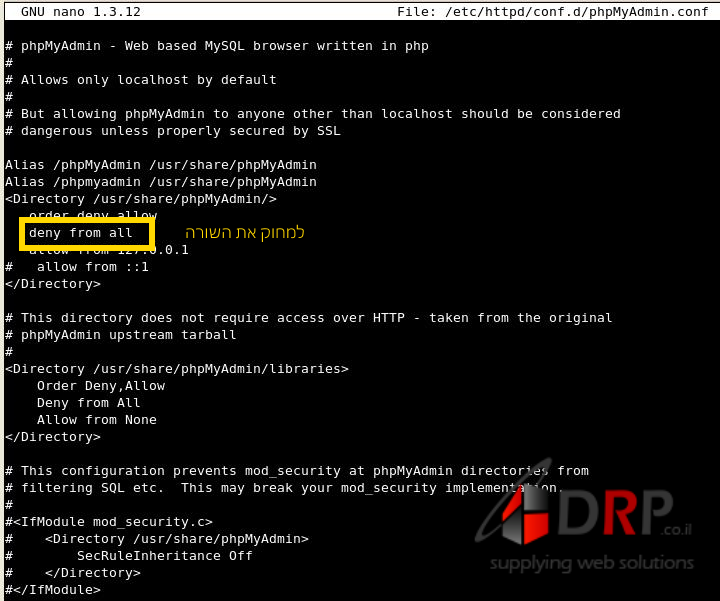
nano /etc/httpd/conf.d/phpMyAdmin.conf
ויפתח לכם עמוד חדש. כעת יש למחוק את השורה הבאה מהבלוק טקסט הראשון.
Deny from All
כעת כדי לגשת phpmyadmin יש להיכנס לדפדפן ולרשןם את כתובת האי פי עם סיומת /phpMyAdmin
לדוגמא :
80.55.125.240/phpmyadmin
פרטי התחברות ראשונים:
user – root
pass – ריק
מקווים שהמדריך עזר לכם מצוות DRP